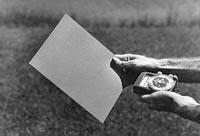
What is a gray card?
In the Zone System this is equivalent to zone V. In the zone system, V is the middle tone half way between black and white.
Here are several situations that benefit greatly by the use of a gray card to check the exposure.Why do we use a gray card?
- Whenever there is any sort of back lighting such as a bright sky or window behind the subject.
- When there is a light source such as bulb or light fixture in front of your camera.
- When there is any type of back light such as a bright sky or window behind the subject.
- When a large part of the scene has a fairly dark tone like a close up of a big black car.
- When a large part of the scene has a fairly light tone like a snow scene.
How we use a gray card
Get the camera close enough
so that only the gray card shows in the viewfinder.
Once you have the meter reading, back off to frame the view as you like.
Be aware that automatic cameras go back to their erroneous
ways as soon as the gray card is out of view.
so that only the gray card shows in the viewfinder.
Once you have the meter reading, back off to frame the view as you like.
Be aware that automatic cameras go back to their erroneous
ways as soon as the gray card is out of view.
|
Article from NY School of Photography: In a "simple" lighting situation - for example, a portrait of your friend taken outdoors under the shade of a tree - the traditional aim-your camera-and-trust-the-meter method usually works just fine. But when the lighting is more complex, you often need to use a different method to get the right exposure. A method that involves reading the light hitting your subject, rather than reading the subject itself. You can do this in either of two different ways - either read the light off a gray card or take an incident reading. Either way should bring you the same result as the other. And both are simple, once you know how. Let's back up a bit first, and discuss how a light-meter - any meter, built-in or hand-held - determines the "right" exposure. For example, you want to determine the right exposure for your friend's face. You point your lens or a hand-held meter toward the face, and your meter tells you the "correct" exposure. Correct for what? Well, correct to produce a pleasing skin tone on B/W film.  But how does the meter know what a "pleasing skin tone" is? It doesn't - and that is the problem. The meter doesn't know if you're pointing to a human face, a field of snow, or a lump of coal. All the meter knows is how to tell you what shutter speed-aperture combination to use to produce an 18% gray tone. Why 18% gray? Why not 25% gray...or 12% gray...or 99% gray? Because it has been determined that if the light in an average scene is averaged out, it will produce an 18% gray tone. So film - color and B/W - is formulated to produce proper exposure when it is exposed to produce an 18% gray tone. Immediately, some questions come to mind. What is an "average scene"? Is a ski slope average? A beach? A neon sign? And what is an average skin tone? Is it the skin of a Swedish blonde? Or a Nigerian black? Or a tanned California sun-worshiper? The meter doesn't know or care. It will tell you how to produce an 18% gray tone no matter what you point it at! Knowing this, we can now proceed. If film - all regular film - is formulated to produce the best exposure when it is exposed to 18% gray light, why not read the light itself? Then, no matter what color your subject is - black, white, red, green, or anything else - if you read the light falling on it, you should come up with a "correct" exposure. And this is exactly what a gray-card reading or an incident-meter reading does. *This is the such an important point, that we suggest your go back and read the last paragraph again (and again, if necessary) so that it is crystal-clear in your mind before you proceed. Method One is to take a gray-card reading. A gray-card is a piece of cardboard that is colored a precise tone that reflects 18% of the light that strikes it. This tone is 18% gray.  You take a reading of a gray card using either your camera's built-in meter or a hand-held. While metering, just make sure the card is tilted so that the light that falls on it is similar to the light that is falling on your subject. You already know that your meter is calibrated to give you a reading that will produce an 18%-gray tone on your film. This means the tone of the gray-card would be duplicated perfectly on the film. It also means that all other tones, lighter or darker, will be faithfully reproduced on the film too. So whether your subject is blonde or brunette, snow or coal, red or green, it will be faithfully reproduced and properly exposed on your film. Where do you get a gray card? There's one in the Kodak Professional Photo Guide, a valuable guidebook that sells for about $32. Or you can buy a Kodak gray-card by itself for $14.95 at your local camera store. Or, if you're an NYI student, you'll get one free as part of your Course when you come to the lesson on Exposure. An incident-reading with a hand-held meter gives you the same result. It reads the light, and tells you what exposure to use to reproduce an 18%-gray tone on your film. Unfortunately, the built-in meter on your camera does not have this capability. But most handheld meters do. To take an incident reading with a hand-held meter, you usually push a milk-colored plastic gizmo (dome) in front of the light-sensitive cell and point the meter away from the subject and toward the light source, like this: The milky plastic dome transmits only 18% of the light it sees. Result: The meter gives you a readout of an exposure that will produce a perfect 18%-gray tone on your film in that light. This should be exactly the same exposure readout that you would have gotten if you had read a gray-card under the same conditions. So once again, the reading will be correct in that light no matter what the coloration of your subject. Now you can see why we recommend that, when you are faced with "tricky" lighting, you use either a gray-card reading or an incident meter reading Do not tip the card down like the picture on the right. Less light is seen by the meter. |


No comments:
Post a Comment